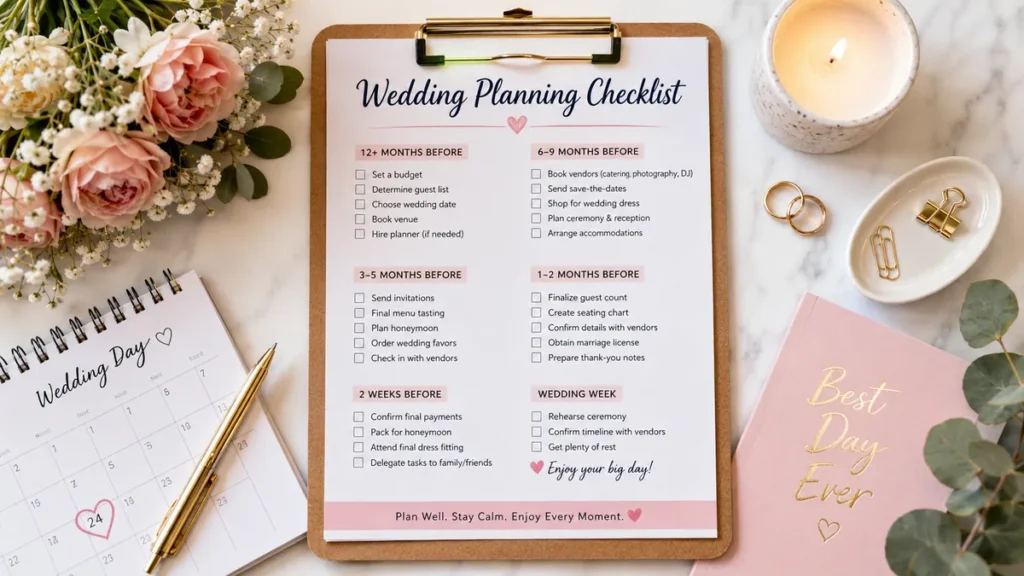
Planning a wedding can feel surprisingly manageable at first—until venue decisions, guest addresses, contracts, fittings, invitations, payments, and dozens of small deadlines begin overlapping. A good wedding planning checklist turns those moving pieces into a sequence you can actually follow.
A wedding planning checklist is a timeline of tasks that takes you from setting your budget and guest count through booking your venue and vendors, sending invitations, finalizing ceremony details, creating a seating plan, confirming logistics, and handling post-wedding tasks. The best checklist is flexible enough to match your wedding date, priorities, traditions, and budget.
This guide uses a 12-month framework because it provides a clear planning sequence, but it isn’t a rule. You can compress the same tasks into six months—or spread them across 18 months—by prioritizing decisions that affect availability and everything that depends on them.
Wedding Planning Checklist: What to Do First
Before comparing flowers or saving centerpiece ideas, establish the practical boundaries of the wedding.
The first decisions influence almost everything that follows:
- Set a realistic wedding budget.
- Draft your guest list.
- Discuss your wedding priorities.
- Choose an approximate date or season.
- Decide whether you’ll hire a wedding planner.
- Research ceremony and reception venues.
- Develop a broad wedding style.
- Create one system for tracking tasks, contracts, contacts, and payments.
Budget and guest count deserve particular attention. The number of people attending affects the size of venue you need, catering costs, rentals, stationery quantities, transportation, seating arrangements, and many other expenses.
Start With Your Wedding Priorities
Each partner should privately identify the three things that matter most and then compare lists.
You might prioritize:
- Photography
- Food
- Live music
- A particular venue
- Guest experience
- Religious or cultural traditions
- Fashion
- Flowers and décor
- A destination celebration
- A smaller guest list
- An extended honeymoon
This simple exercise helps when the budget eventually forces trade-offs.
If photography is one of your biggest priorities, for example, spending more there and simplifying favors may feel completely reasonable. Without priorities, couples can end up spending money evenly rather than intentionally.
Create a Wedding Budget Before Booking Vendors
Your budget should be more detailed than one maximum spending number.
Create categories for:
| Budget Category | Expenses to Consider |
|---|---|
| Venue | Rental fee, ceremony space, service fees |
| Catering | Meals, appetizers, beverages, staffing |
| Photography | Coverage, second photographer, albums |
| Videography | Coverage, editing, highlight film |
| Attire | Clothing, alterations, shoes, accessories |
| Flowers | Bouquets, boutonnieres, ceremony and reception arrangements |
| Entertainment | DJ, band, musicians, sound equipment |
| Stationery | Save-the-dates, invitations, menus, programs, thank-you cards |
| Rentals | Tables, chairs, linens, tents, lighting |
| Beauty | Hair, makeup, trials, grooming |
| Transportation | Couple, wedding party, guest transportation |
| Ceremony | Officiant, license, programs, musicians |
| Other | Tips, gifts, favors, signage, unexpected expenses |
Keep a contingency amount instead of allocating every available dollar immediately. Small costs often appear later: delivery charges, alterations, postage, overtime, accessories, vendor meals, transportation changes, or additional rental pieces.
Build a Preliminary Guest List
Create the guest list early—even if it changes.
Separate names into groups such as:
- Immediate family
- Extended family
- Close friends
- Other friends
- Coworkers
- Family friends
- Children
- Plus-ones
Record mailing addresses and contact information in the same spreadsheet or guest-list manager.
Later, the same document can track save-the-dates, invitations, RSVPs, meal selections, dietary restrictions, gifts, table assignments, and thank-you notes.
Quick Takeaway: Budget, guest count, venue, and date are interconnected. Avoid treating them as four independent decisions.
12+ Months Before: Establish the Wedding Foundation
The beginning of your wedding planning checklist is about making high-impact decisions rather than choosing small decorative details.
Set the Budget and Guest Count
Discuss:
- Who is contributing financially?
- How much is available?
- What expenses are included?
- What are your non-negotiables?
- Approximately how many people will attend?
If family members are contributing, clarify whether their contribution comes with expectations about guests, traditions, location, or other decisions.
Having these conversations early can prevent uncomfortable surprises later.
Choose Your Wedding Date or Season
You don’t necessarily need one exact date before researching venues.
It can be easier to start with:
- Preferred month
- Preferred season
- Day of the week
- Several acceptable dates
Check important family commitments, religious holidays, major local events, and travel considerations before committing.
Decide Whether You Need a Wedding Planner
A full-service wedding planner may help with budgeting, vendor sourcing, design, scheduling, contracts, and logistics. Other couples may prefer partial planning or a coordinator who becomes involved closer to the wedding.
If you’re planning independently, assign clear responsibilities between partners instead of allowing one person to become the default project manager.
Research and Tour Venues
Consider more than appearance.
Ask about:
- Maximum capacity
- Ceremony and reception options
- Indoor backup plans
- Accessibility
- Parking
- Noise restrictions
- Catering policies
- Alcohol policies
- Setup and breakdown times
- Tables and chairs
- Required vendors
- Rental inclusions
- Overtime charges
- Weather contingency plans
A beautiful venue that requires extensive rentals or transportation can affect the budget differently from an all-inclusive space.
Begin Your Wedding Style Research
Create a shared inspiration folder or mood board using colors, textures, fashion, flowers, stationery, lighting, and venue references.
Don’t worry about defining every detail.
At this stage, you’re looking for patterns.
10–12 Months Before: Book Your Core Wedding Vendors
Once the venue and date are secured, move quickly to vendors whose availability is tied to one specific day.
Book the Ceremony and Reception Venue
Read the complete contract before paying a deposit.
Confirm:
- Exact event date
- Access hours
- Deposit schedule
- Cancellation terms
- Included equipment
- Staffing
- Insurance requirements
- Catering restrictions
- Cleanup responsibilities
- Final payment deadline
Keep a digital copy of every signed agreement.
Hire Your Highest-Priority Vendors
Depending on your wedding, this may include:
- Wedding planner
- Photographer
- Videographer
- Caterer
- Band or DJ
- Officiant
Photographers and entertainment professionals generally cannot serve multiple weddings simultaneously, making date-specific vendors worth researching early.
Start Shopping for Wedding Attire
Wedding dresses and other made-to-order clothing may require ordering, delivery, fittings, and alterations.
Start early enough that you aren’t relying on rush options.
Think about the entire look rather than the primary outfit alone:
- Shoes
- Jewelry
- Veil or headpiece
- Undergarments
- Suit or tuxedo
- Shirt
- Tie or bow tie
- Accessories
- Cultural or ceremonial attire
Take Engagement Photos
An engagement session isn’t mandatory, but it can help you become comfortable working with your photographer before the wedding.
Photos can also be used on your wedding website or save-the-dates.
Create Your Wedding Website
A wedding website gives guests one central source for changing information.
Useful sections include:
- Date
- Location
- Schedule
- Dress code
- Travel information
- Accommodation
- Transportation
- Registry
- RSVP instructions
- Frequently needed logistical information
Keep private details—especially information that shouldn’t be publicly searchable—off unrestricted pages.
8–10 Months Before: Build Your Vendor Team and Guest Experience
With the foundation established, start filling in the vendors and services that shape how the celebration looks and feels.
Book Remaining Major Vendors
Research and book, where relevant:
- Florist
- Caterer
- Cake designer
- Hair and makeup professionals
- Ceremony musicians
- Reception entertainment
- Lighting
- Rental company
- Transportation
- Photo booth or specialty entertainment
Ask each vendor what they provide themselves and what you need to arrange separately.
For example, don’t assume your caterer provides linens or your venue supplies microphones.
Send Save-the-Dates
Save-the-dates are particularly helpful when guests need significant travel time or accommodation.
Before sending them, make sure:
- Your date is confirmed.
- Your venue or destination is secured.
- The recipient is definitely invited.
- Your website contains basic travel information.
Once someone receives a save-the-date, removing them from the final guest list can create an awkward situation.
Reserve Guest Accommodation
If many people are traveling, investigate hotel-room blocks or nearby accommodation.
Compare:
- Distance from venue
- Transportation
- Parking
- Booking deadline
- Minimum commitments
- Cancellation terms
- Different price points
Create Your Registry
A registry can be included on your wedding website rather than printed prominently on formal invitations.
Couples who already share a household may choose traditional household items, upgraded essentials, experiences, honeymoon funds, charitable options, or a combination.
Choose the Wedding Party’s Attire
If you’re having bridesmaids, groomsmen, attendants, or other wedding-party members, decide:
- Who pays
- Required colors
- Exact outfit versus flexible guidelines
- Ordering deadline
- Shoes and accessories
- Alteration responsibilities
Clear instructions make this easier for everyone.
6–8 Months Before: Plan the Ceremony, Food, Travel, and Rentals
This stage connects your overall wedding vision with practical logistics.
Plan the Ceremony Structure
Meet with your officiant and discuss the ceremony.
Possible elements include:
- Processional
- Welcome
- Readings
- Religious or cultural rituals
- Personal vows
- Traditional vows
- Ring exchange
- Pronouncement
- Recessional
If your ceremony includes multiple religions, languages, or cultural traditions, determine early how much time each component needs.
Research Marriage License Requirements
Marriage laws and license procedures vary by jurisdiction, so verify requirements with the relevant government authority where the legal marriage will take place.
Check:
- Identification requirements
- Application process
- Fees
- Waiting period
- Expiration period
- Witness requirements
- Who can legally officiate
- How the completed license is returned
Do this early enough to understand the process, but don’t obtain a time-limited license too soon.
Finalize Catering Direction
Work with your caterer on:
- Cocktail-hour food
- Main meal
- Dietary accommodations
- Children’s meals
- Vendor meals
- Desserts
- Beverage service
- Late-night food, if applicable
Ask how allergies and dietary restrictions will be communicated to service staff.
Arrange Rentals
Depending on what your venue provides, you may need:
- Tables
- Chairs
- Linens
- Glassware
- Flatware
- Dinnerware
- Tents
- Heaters or fans
- Lounge furniture
- Dance floor
- Lighting
- Ceremony structures
Rental quantities will usually be adjusted when the final guest count is available.
Plan Transportation
Consider transportation for:
- The couple
- Wedding party
- Immediate family
- Guests
- Anyone moving between ceremony and reception venues
Also decide how personal items, flowers, gifts, décor, and leftover belongings will get home after the reception.
That last part is easy to forget.
Quick Takeaway: Don’t plan only how people arrive. Your logistics plan should also explain how people—and important belongings—leave.
4–6 Months Before: Invitations, Rings, Beauty, and Wedding-Day Details
The broad structure should now be established. This is when details become more specific.
Choose and Order Wedding Invitations
Your invitation suite might include:
- Main invitation
- RSVP instructions
- Details card
- Accommodation information
- Reception card
- Directions
- Wedding website information
Proofread every detail carefully.
Check names, date, ceremony time, addresses, spelling, website information, and RSVP deadline before approving the final version.
Purchase Wedding Rings
Allow time for ordering, engraving, resizing, or custom work.
Try the rings alongside any engagement ring to see how they sit together.
Schedule Hair and Makeup Trials
Bring useful references to your trial, but also consider:
- Wedding attire
- Neckline
- Headpiece or veil
- Weather
- Ceremony time
- Photography
- Hair texture
- Skin type
- How long the look needs to last
Photograph the finished trial in different lighting.
Plan Your Honeymoon
If you’re traveling internationally, check passports, visas, travel requirements, insurance, transportation, and accommodation well in advance.
Also check whether changing your legal name immediately after the wedding could conflict with travel documents already booked under your current name.
Plan the Rehearsal Dinner or Welcome Event
Decide:
- Host
- Guest list
- Location
- Budget
- Menu
- Timing
- Invitations
- Speeches or gifts
For destination weddings, couples may also arrange welcome events or informal gatherings for traveling guests.
3–4 Months Before: Turn Your Plans Into a Detailed Schedule
At this stage, you should know what is happening. Now determine exactly when and where it happens.
Send Wedding Invitations
Set an RSVP deadline that leaves enough time to provide vendors with their required final numbers.
Track responses in your guest-list system rather than relying on memory, messages, or scattered emails.
Record:
- Attending/not attending
- Plus-one
- Meal choice
- Dietary restrictions
- Accessibility requirements
- Transportation
- Accommodation information, if relevant
Finalize Your Menu and Cake
Attend tastings where offered.
Confirm the final menu structure, service style, dessert plan, beverages, and dietary accommodations.
If you’re serving cake, establish:
- Size
- Flavors
- Design
- Delivery
- Display
- Cutting arrangements
- Storage of leftovers
Create Your Music List
Give your DJ or band more than a playlist.
Identify:
- Processional music
- Ceremony entrance
- Recessional
- Couple’s entrance
- First dance
- Parent or family dances
- Cake cutting
- Last dance
- Must-play songs
- Do-not-play songs
Leave room for the entertainment professional to respond to the room rather than programming every minute yourself.
Create a Photography Shot List
Your photographer doesn’t need a catalog of obvious photographs. A useful shot list focuses on people or moments they couldn’t reasonably know about.
Include:
- Important family combinations
- Elderly relatives
- Special traditions
- Meaningful objects
- Surprise performances
- Unusual ceremony moments
Assign someone who knows the families to help gather people for formal portraits.
Begin Writing Wedding Vows
If you’re writing personal vows, starting early gives you time to edit rather than trying to find the right words the night before.
Discuss approximate length and tone with your partner so one person doesn’t prepare a two-minute vow while the other arrives with a ten-minute speech.
2 Months Before: Confirm the Guest Experience
The wedding is close enough that your focus should move from creating new ideas to finishing existing plans.
Follow Up on Missing RSVPs
Contact guests who haven’t responded.
Don’t finalize the seating chart until you have a reliable guest count.
Build the Seating Plan
Start with household groups and relationships before assigning exact seats.
Consider:
- Family dynamics
- Couples
- Children
- Accessibility
- Elderly guests
- Speaker placement
- Dance-floor proximity
- Dietary needs
- Guests who know few other attendees
A seating chart isn’t about creating perfect social chemistry. Its job is to make everyone comfortable enough to enjoy the event.
Order Day-of Stationery and Signage
Depending on your wedding, you might need:
- Ceremony programs
- Welcome sign
- Seating chart
- Escort cards
- Place cards
- Table numbers
- Menus
- Bar signs
- Guest-book sign
- Reserved-seat signs
Before ordering signs, ask yourself whether each one communicates information guests actually need.
Too much signage can create clutter without improving the experience.
Confirm Ceremony Details
Review the ceremony with your officiant.
Finalize:
- Order of events
- Readings
- Reader names
- Vows
- Music cues
- Processional order
- Ring exchange
- Rituals
- Pronunciation of names
Give readers enough time to practice.
1 Month Before: Finalize the Wedding Planning Checklist
This is where organization becomes more valuable than inspiration.
Avoid introducing unnecessary new projects.
Obtain Your Marriage License at the Appropriate Time
Follow the rules for the jurisdiction where your marriage will legally occur.
Check the license carefully once issued.
Confirm names, dates, and other details before leaving the issuing office when possible.
Attend Final Attire Fittings
Bring the items you’ll actually wear:
- Shoes
- Undergarments
- Jewelry
- Shapewear
- Veil or headpiece
- Accessories
Practice walking, sitting, turning, and dancing in the finished outfit.
Create the Wedding-Day Timeline
Build one master timeline rather than separate, conflicting schedules.
It should include:
| Time | Example Activity |
|---|---|
| Morning | Vendor access and setup |
| Getting ready | Hair, makeup, attire |
| Pre-ceremony | First look and portraits |
| Ceremony | Guest seating and processional |
| Cocktail hour | Family and wedding-party photos |
| Reception | Entrance, meal, speeches, dances |
| Evening | Cake, entertainment, last dance |
| End | Guest departure and vendor breakdown |
Work backward from fixed events.
If the ceremony begins at 4:00 p.m., for example, determine when guests should arrive, when portraits need to finish, when dressing must be completed, and when hair and makeup therefore need to begin.
Add buffer time.
A timeline with every activity touching the next one leaves no room for traffic, wardrobe problems, delayed relatives, or photographs running longer than expected.
Distribute the Timeline
Send relevant versions to:
- Planner or coordinator
- Venue
- Photographer
- Videographer
- Caterer
- Entertainment
- Officiant
- Transportation provider
- Hair and makeup team
- Wedding party
- Immediate family
Not everyone needs every detail. Vendors should receive the information required for their role plus the contact details of the person coordinating the day.
Confirm Vendor Payments
Create a payment tracker showing:
- Vendor
- Total contract amount
- Deposit paid
- Remaining balance
- Due date
- Payment method
- Tip, where appropriate
- Person responsible
Keep receipts and payment confirmations together.
2 Weeks Before: Lock Down Final Numbers and Responsibilities
Your planning should now shift into confirmation mode.
Give Vendors the Final Guest Count
Confirm the final number by each vendor’s contractual deadline.
Update:
- Caterer
- Venue
- Rental company
- Stationer, if needed
- Transportation provider
Finalize meal selections and dietary requirements at the same time.
Confirm Every Vendor
You shouldn’t need to renegotiate the wedding two weeks beforehand.
Instead, verify:
- Arrival time
- Contact person
- Location
- Setup requirements
- Final quantities
- Outstanding balance
- Departure time
- Important timeline cues
Keep emergency contact numbers accessible offline.
Prepare Wedding-Day Payments and Tips
If any payments or gratuities need to be handled on the wedding day, prepare them beforehand and assign distribution to a trusted person.
The couple shouldn’t be locating envelopes during the reception.
Prepare Welcome Bags
For destination weddings or large numbers of traveling guests, welcome bags might contain:
- Schedule
- Transportation instructions
- Local information
- Water
- Snacks
- Emergency contact details
Keep them useful rather than filling them with items guests will leave behind.
1 Week Before: Stop Planning and Start Executing
The week before your wedding isn’t the ideal time for major design changes.
Your goal is readiness.
Finalize the Seating Chart
Double-check:
- Names
- Table numbers
- Meal selections
- Accessibility
- Highchairs
- Vendor seating
Send the final version to anyone who needs it.
Prepare a Wedding Emergency Kit
Useful items may include:
- Safety pins
- Fashion tape
- Stain remover
- Sewing kit
- Tissues
- Bandages
- Pain reliever
- Blister treatment
- Phone charger
- Snacks
- Water
Tailor the kit to your venue, attire, weather, and wedding party.
Pack Items by Destination
Don’t create one enormous box labeled “wedding.”
Separate items by where they need to go:
Ceremony
- Marriage documents
- Rings
- Programs
- Vows
- Ceremony décor
Reception
- Place cards
- Table numbers
- Guest book
- Signage
- Favors
- Décor
Personal
- Attire
- Shoes
- Accessories
- Toiletries
- Medication
- Overnight bag
Label everything.
Assign Responsibilities
Give specific jobs to specific people.
For example:
- Who holds the rings?
- Who has the marriage license?
- Who takes gifts home?
- Who collects personal décor?
- Who handles vendor questions?
- Who gathers family for photographs?
- Who returns rentals?
- Who has the emergency kit?
“Someone will handle it” isn’t a plan.
Quick Takeaway: A strong wedding-day system gives every important object, task, and decision a named owner.
The Day Before: Keep the Final Preparations Simple
Most planning should be finished.
Attend the Ceremony Rehearsal
Practice:
- Processional order
- Where everyone stands
- Music cues
- Readings
- Ring exchange
- Recessional
You don’t need to perform the entire ceremony word for word.
The purpose is to make everyone comfortable with movement and timing.
Give Important Items to Trusted People
Hand off:
- Rings
- Marriage license
- Vendor payment envelopes
- Emergency kit
- Personal vows, if appropriate
Confirm who will bring each item to the ceremony.
Charge Your Devices
Charge phones, portable chargers, and anything else you’re responsible for bringing.
Then try to get a normal night’s sleep rather than spending midnight finishing DIY decorations.
Wedding Day Checklist: What Actually Matters
Your wedding day should no longer feel like a planning day.
If something requires constant decision-making from you, responsibility probably wasn’t delegated clearly enough.
Eat and Hydrate
Schedule actual food while getting ready.
With photographs, greetings, ceremonies, and speeches, couples can easily go hours without eating unless someone plans for it.
Keep Essential Items Nearby
Have access to:
- Identification if required
- Marriage documents
- Rings
- Vows
- Phone
- Emergency kit
- Any necessary medication
- Comfortable backup shoes, if desired
Let Your Vendors Work
You hired professionals for a reason.
Give your planner, coordinator, venue manager, photographer, caterer, DJ, band, florist, and other vendors the information they need and let them execute their roles.
Small deviations from the schedule are normal.
Build Space Into the Day
Not every five minutes needs an activity.
A few unscheduled moments let you:
- Eat
- Talk privately
- Greet guests
- Take photographs
- Fix clothing
- Absorb what’s happening
The best timeline isn’t necessarily the one that runs with military precision. It’s the one that can absorb a delay without disrupting the celebration.
After the Wedding: Tasks People Often Forget
A complete wedding planning checklist doesn’t stop when the reception ends. Several administrative and practical jobs remain.
Return Rentals
Identify in advance who is responsible for returning:
- Clothing
- Décor
- Rental equipment
- Transportation items
- Cake stands
- Specialty accessories
Watch the deadlines to avoid late charges.
Preserve Wedding Attire
If you plan to preserve a wedding dress, suit, cultural outfit, veil, or other meaningful clothing, follow appropriate cleaning and storage instructions.
Don’t leave stained formalwear packed away for months.
Send Thank-You Notes
Track gifts as you receive them.
Record:
- Guest name
- Gift
- Date received
- Thank-you sent
Personal notes are easier to write when you know exactly what each person gave.
Review Final Expenses
Compare your original wedding budget with actual spending.
Check that:
- Final invoices are paid.
- Refundable deposits are returned.
- Unexpected charges are understood.
- Receipts are stored.
- Shared expenses are settled.
Complete Legal or Name-Change Tasks
If either partner is changing their name, follow the legal process applicable to your jurisdiction.
Don’t assume the marriage certificate automatically updates passports, licenses, financial accounts, employment records, insurance, or other documents.
How to Use This Checklist for a Shorter Planning Timeline
What if you have six months, three months, or even less?
Don’t attempt to preserve the monthly spacing of a traditional timeline.
Preserve the order of dependencies instead.
First: Secure the Decisions That Control Everything Else
Immediately establish:
- Budget
- Guest count
- Date
- Venue
- Ceremony arrangements
Once those are confirmed, you can book date-dependent vendors.
Second: Book Vendors With Limited Availability
Prioritize:
- Photographer
- Videographer
- Caterer
- Entertainment
- Officiant
- Planner or coordinator
- Florist
- Hair and makeup
If your first choice isn’t available, move quickly rather than spending weeks trying to recreate an exact original plan.
Third: Handle Items With Production or Processing Time
Move next to:
- Attire
- Alterations
- Rings
- Invitations
- Rentals
- Custom stationery
- Travel documents
Fourth: Finish Flexible Details
Décor, favors, playlists, signage, and other adjustable elements can usually come after the decisions that determine whether the event can function.
A shorter timeline requires quicker decisions, not necessarily a less meaningful wedding.
Common Wedding Planning Mistakes to Avoid
A checklist is useful partly because it prevents small organizational mistakes from becoming expensive problems.
Booking a Venue Before Understanding the Guest Count
A venue for 100 guests isn’t automatically workable for 150.
Build at least a rough guest list first.
Spending the Entire Budget Too Early
Leave room for expenses that appear later.
A budget with no contingency can become stressful when final quantities, alterations, delivery fees, or logistical expenses arrive.
Assuming Something Is Included
If something matters, check the contract.
Never assume the venue provides chairs, the caterer supplies linens, the DJ provides ceremony sound, or the florist returns to move arrangements between spaces.
Ignoring the Bad-Weather Plan
Outdoor weddings need a realistic alternative.
Ask exactly what happens if weather changes:
- Where does the ceremony move?
- When is the decision made?
- Who makes it?
- Are tents available?
- Are there extra charges?
- Can the backup space hold everyone?
The backup should be acceptable—not merely technically possible.
Creating Too Many DIY Projects
DIY can personalize a wedding, but each project adds materials, storage, transportation, setup, and cleanup.
Ask who will physically transport and install everything.
If the answer is “us on the morning of the wedding,” reconsider the project.
Forgetting Vendor Meals
Photographers, videographers, planners, musicians, and other professionals working long hours may require meals under their contracts.
Confirm requirements with your caterer.
Making the Timeline Too Tight
Travel takes time. Family photographs take time. Clothing changes take time.
Build buffers around transitions instead of assuming every event will begin the second the previous one ends.
Trying to Please Every Guest
Guest comfort matters. Designing the entire wedding around every person’s preferences is impossible.
Focus on hospitality: clear communication, sufficient food, comfortable logistics, accessibility, and reasonable scheduling.
The celebration itself should still reflect the couple.
The Simplest Way to Stay Organized
The most effective wedding-planning system doesn’t need to be complicated.
Maintain one central planning hub with five sections:
- Checklist: Tasks, deadlines, and owners.
- Budget: Estimates, deposits, balances, and actual costs.
- Guest list: Addresses, RSVPs, meals, seating, and gifts.
- Vendor file: Contacts, contracts, payments, and notes.
- Timeline: Wedding-week and wedding-day schedules.
Digital planning tools from The Knot, WeddingWire, and Zola offer customizable checklist systems, while a spreadsheet can work equally well if you prefer complete control over your planning structure. Current planning resources consistently emphasize customization because wedding timelines vary according to the couple, traditions, priorities, and event format.
Whichever method you choose, avoid maintaining several competing versions of your guest list, budget, and vendor information. One reliable source of truth prevents mistakes.
Final Wedding Planning Checklist Takeaway
A wedding planning checklist works best when you treat it as a flexible project plan rather than a set of rigid deadlines.
Start with the decisions that influence everything else: your budget, priorities, guest count, date, and venue. Then secure date-dependent vendors, handle attire and stationery, plan the ceremony and reception, collect RSVPs, build your seating chart, and turn everything into a detailed wedding-day timeline.
As the wedding approaches, stop adding ideas and start confirming details.
And remember that not every traditional checklist item belongs at every wedding. You don’t need a wedding party, favors, a cake, matching attire, elaborate flowers, a rehearsal dinner, or any other optional tradition simply because it appears on somebody else’s list.
Keep what supports your celebration. Remove what doesn’t.
The most useful checklist isn’t the one with the greatest number of boxes. It’s the one that gets the right people, information, payments, and decisions into the right place at the right time—so when the wedding day arrives, you’re finally finished planning and free to experience it.