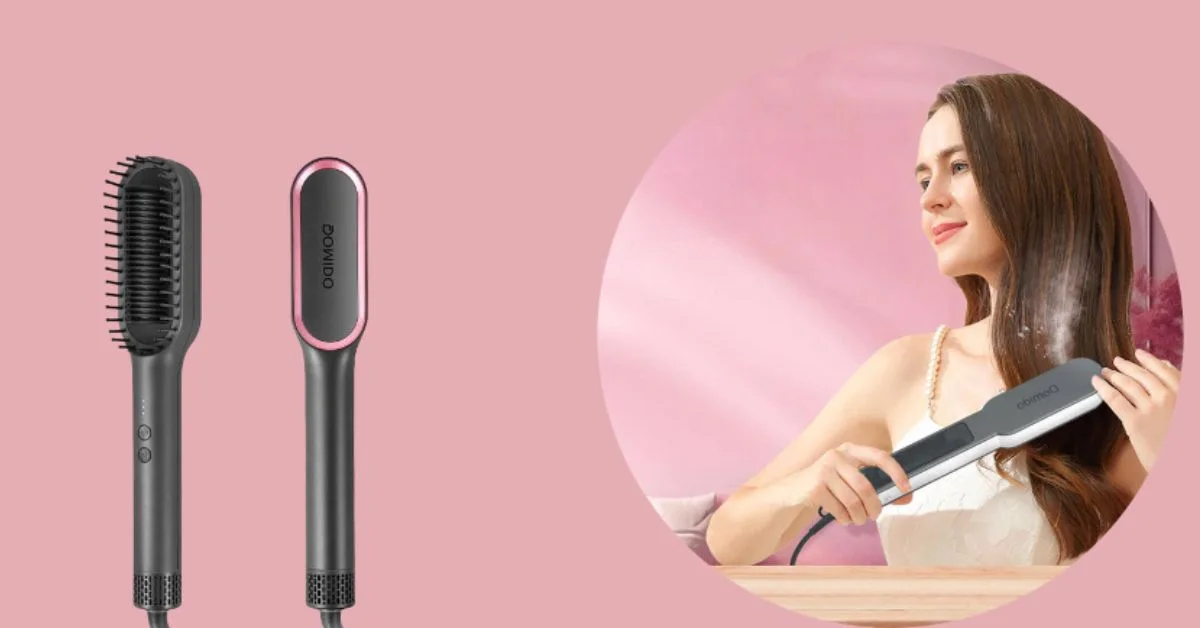
Achieving flawless, straight hair can be a challenge without the right tools and techniques. The straightening brush, a combination of a hairbrush and flat iron, offers a quick and efficient way to achieve sleek, shiny hair. However, mastering this tool requires a few key hacks to ensure you get professional results every time. Below, we’ll explore some essential straightening brush hacks to elevate your styling game.
Start with Clean Hair
For best results, always begin with freshly washed and thoroughly dried hair. Wet or damp hair doesn’t straighten well and can become frizzy or damaged. Clean hair ensures that the straightening brush glides smoothly through each strand, giving you that polished look you desire.
In addition to washing, make sure to detangle your hair before using the straightening brush. This reduces the chance of breakage and allows for a more even, consistent result. Use a wide-toothed comb or a detangling brush to remove knots gently.
Apply Heat Protectant
Using a heat protectant is crucial when styling your hair with high temperatures. Heat can strip your hair of moisture, leaving it dull and brittle. A good heat protectant forms a barrier that shields your hair from potential damage while also smoothing the cuticle for a glossy finish.
Spray the heat protectant evenly through your hair before you begin straightening. Make sure to focus on the ends, which are usually the driest and most susceptible to heat damage. This step is essential for maintaining hair health and getting a salon-quality finish.
Section Your Hair
Sectioning your hair before using a straightening brush helps you achieve a more controlled, even look. Start by dividing your hair into four sections—top and bottom, left and right—and secure each section with clips. This allows you to work on smaller portions at a time, ensuring you don’t miss any areas.
Working in sections also prevents you from rushing and ensures that you’re thorough with each pass of the brush. This attention to detail makes the difference between a rushed job and a professional-quality result.
Adjust Temperature Settings
The right temperature setting is essential for getting professional results without damaging your hair. If you have fine or thin hair, keep the temperature between 300°F and 350°F. For thicker, coarser hair, use a higher temperature up to 450°F to effectively straighten without excess effort.
Pay attention to your hair’s texture and condition when choosing the temperature. Too much heat can lead to frizz or damage, while too little may not straighten as effectively. Adjust accordingly for the best results every time.
Take Your Time
Rushing through the straightening process will often lead to unsatisfactory results. For smooth, polished hair, take your time and allow the brush to work its magic. Slow, deliberate strokes allow the heat to penetrate the hair shaft fully, leaving you with sleek, straight hair.
Be patient when working through each section of your hair. The more time you invest in straightening, the more professional and polished your end result will look. Avoid hasty movements to ensure each strand is styled evenly.
Focus on the Roots
For a truly professional look, don’t neglect the roots. Often, people focus on the ends of their hair, but the roots are where the most volume and frizz reside. Position the straightening brush near the roots and use it to gently smooth them down.
To ensure you don’t burn your scalp, work in smaller sections near the roots. This targeted approach gives your hair a polished, sleek look from top to bottom, creating a seamless, straight appearance that lasts.
Use Right Brushing Technique
The way you hold the brush matters when it comes to getting smooth, straight hair. Hold the brush firmly at the base of each section and slowly pull it through your hair. A steady, controlled motion allows the heat to distribute evenly and results in a smoother finish.
Avoid pulling the brush too quickly through the hair, as this can cause uneven straightening and may even lead to tangling. The key is to allow the brush to glide naturally while keeping it in constant motion for the best results.
Don’t Overdo It
It’s tempting to go over the same section multiple times, but this can lead to heat damage and an unnatural, flat look. One or two passes of the straightening brush should be enough for most hair types. Repeated brushing can strip hair of moisture and cause it to look dull.
Instead, focus on making those first passes count. If needed, go back over particularly stubborn areas, but avoid overdoing it to maintain volume and health. This keeps your hair looking natural while achieving a professional style.
Clean Your Brush Regularly
A clean straightening brush works better and gives more consistent results. Over time, product buildup, hair strands, and oils can accumulate on the bristles, reducing the efficiency of the brush. Regular cleaning ensures that the brush operates smoothly every time you use it.
Use a soft cloth or brush cleaning tool to gently remove any buildup on the bristles. Cleaning the brush after every use also ensures that your hair stays fresh and free from unwanted residues that can affect your results.
Right Brush for Your Hair Type
Not all straightening brushes are the same, and choosing the right one for your hair type is crucial. For fine hair, opt for a brush with softer bristles and lower heat settings, or consider pairing it with a flat iron for a sleeker finish. Coarse or thick hair requires a sturdier brush with more powerful heat settings to effectively straighten, and you may want to follow up with a flat iron for a perfectly smooth result.
Understanding your hair’s needs and selecting a straightening brush or flat iron designed for your specific texture ensures the best outcomes. Investing in the right tool tailored to your hair type not only saves you time but also helps achieve the professional, polished look you’re aiming for.
Finish with a Smoothing Serum
To complete your straightening routine, apply a smoothing serum or finishing spray. This adds shine and tames any remaining flyaways. Professional stylists often use a serum to lock in moisture and provide that shiny, polished look seen on the runway.
Apply the serum sparingly to avoid weighing down your hair. Focus on the ends and any frizz-prone areas for an ultra-smooth finish that’s glossy and well-managed.
Try Other Styles with Your Brush
While straightening is the most common use, your straightening brush can also create waves or curls. By rotating the wrist as you pull the brush down, you can achieve soft, beachy waves or even bouncy curls. This versatility allows you to switch up your style without needing multiple tools.
Experiment with different techniques to create various looks that are just as professional as a straight style. The ability to change up your hairstyle with the same tool gives you more styling options with less effort.
Protect Your Hair from Excess Heat
While heat styling tools are incredibly effective, they can also cause long-term damage if used too often. To protect your hair, alternate between heat styling and heat-free days. Additionally, use deep conditioning treatments regularly to restore your hair’s natural moisture and shine.
On days when you do use the straightening brush, try to limit the time your hair is exposed to heat. This helps prevent excessive damage and ensures that your hair stays healthy and vibrant over time.
Finish with Cold Air
After styling, finish by blasting your hair with cool air from a blow dryer. This technique helps seal the cuticle, locking in the sleekness and adding shine. The cold air also helps reduce any frizz and holds your style in place for longer periods.
This simple step can make all the difference in achieving that flawless, professional look. It’s a quick, easy way to set your straightened hair while enhancing its shine and smoothness.
Conclusion
Using a straightening brush to achieve professional results requires the right techniques and tools. By following these simple hacks, you can ensure that your hair looks sleek, shiny, and perfectly straight every time. With a little patience and the right approach, you’ll achieve salon-quality hair in the comfort of your own home.
If you find this article helpful, click here for more.


