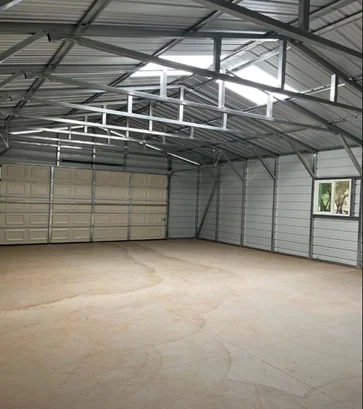
Building your own small metal shed or workshop can be a rewarding and practical DIY project. Whether you need extra storage for tools and equipment or a dedicated space for hobbies and repairs, a metal shed offers durability, versatility, and affordability. Taking on the project yourself allows you to customize the structure to meet your needs while saving on labor costs.
In this guide, we’ll walk you through the essential steps to building your own metal building or workshop in Auburn, including planning, tools, and key tips to ensure a successful project.
Why Choose Metal for Your Shed or Workshop?
Metal buildings have several advantages that make them an ideal choice for sheds and workshops. Here are a few key reasons why metal might be the perfect material for your DIY project:
- Durability: Metal is resistant to weather, pests, and rot, making it a long-lasting material for outdoor structures.
- Low Maintenance: Unlike wood, metal sheds require minimal upkeep and are less prone to damage from moisture or insects.
- Fire Resistance: Metal buildings are naturally fire-resistant, adding an extra layer of safety for your shed or workshop.
- Ease of Assembly: Many metal shed kits are designed for easy assembly, allowing you to complete the project without specialized skills.
Planning Your DIY Metal Shed or Workshop
Before you start building, proper planning is essential. Here’s how to ensure your project gets off to a smooth start:
1. Determine the Size and Purpose
The size of your metal shed or workshop will depend on its intended use. For basic tool storage, a small shed might be sufficient, while a workshop will require more space for workbenches and equipment. Consider the following questions:
- What will you store or work on in the shed?
- How much floor space do you need?
- Will you need electricity, ventilation, or insulation?
2. Check Permits and Zoning Requirements
Before you begin, check with your local government to see if a building permit is required for your project. Zoning laws may also dictate where you can place the shed and how large it can be. Always ensure your project complies with local regulations to avoid fines or delays.
3. Choose the Right Location
When selecting a site for your metal shed or workshop, consider factors such as:
- Ground stability: Choose a level area with good drainage to prevent water pooling around the structure.
- Accessibility: Ensure the shed is easy to access from your home or garage.
- Sunlight: Consider how much natural light you’ll want inside the workshop. Placing windows in sunny spots can improve lighting and energy efficiency.
Gathering Materials and Tools
Once you’ve planned the size, location, and purpose of your shed, it’s time to gather the necessary materials and tools.
Materials You’ll Need
- Metal shed kit (if using a pre-made kit)
- Metal panels (if building from scratch)
- Anchors and fasteners (for securing the structure to the ground)
- Metal frame or support beams
- Roofing materials (if not included in the kit)
- Concrete or gravel (for the foundation)
- Optional: Windows, doors, insulation, and electricity components
Tools Required
- Drill and metal screws
- Level
- Tape measure
- Wrenches and screwdrivers
- Ladder
- Safety gear (gloves, safety glasses)
If you’re building from a kit, the kit will typically include most of the components needed. However, you’ll still need to ensure you have the right tools and any additional materials.
Building Your Metal Shed: Step-by-Step Guide
Now that you’ve planned and gathered your materials, it’s time to start building. Here’s a step-by-step process to guide you through the construction of your small metal shed or workshop:
Step 1: Prepare the Foundation
A sturdy foundation is essential for the longevity and stability of your shed. There are a few foundation options:
- Concrete slab: For maximum durability, pour a concrete slab to serve as the foundation.
- Gravel base: A gravel base is easier to install and provides good drainage, though it may not be as sturdy as concrete.
Level the ground before placing the foundation material, ensuring it’s even and free of debris.
Step 2: Assemble the Frame
Start by assembling the metal frame of your shed or workshop. If you’re using a kit, follow the manufacturer’s instructions. If building from scratch, use metal support beams to create the frame. This structure will provide the necessary stability for the walls and roof.
Use a level to ensure the frame is square and even, and secure it to the foundation with anchors or bolts.
Step 3: Install the Wall Panels
Once the frame is complete, you can attach the metal wall panels. Make sure the panels are properly aligned and fastened securely to the frame. Overlap the edges of the panels to prevent water from seeping in between them.
If your shed will have windows or doors, cut the necessary openings in the wall panels and install these components according to your plans.
Step 4: Attach the Roof
After the walls are installed, it’s time to assemble and attach the roof. Depending on the design, your metal shed may have a sloped or gabled roof. Make sure to fasten the roof panels securely to prevent leaks and damage from strong winds.
If you’re in an area prone to heavy snowfall, consider reinforcing the roof to handle additional weight.
Step 5: Add Finishing Touches
Once the main structure is in place, you can add the finishing touches to your shed or workshop. This may include:
- Installing insulation for temperature control
- Adding ventilation or fans to improve airflow
- Running electrical wiring for lights, outlets, or equipment
- Painting or sealing the metal for added weather resistance
Tips for a Successful DIY Metal Shed Project
- Follow instructions carefully: If using a kit, always follow the manufacturer’s instructions closely to avoid mistakes.
- Work with a partner: Building a shed alone can be challenging, especially when assembling large panels or working on the roof. Having an extra pair of hands makes the job safer and easier.
- Focus on safety: Metal edges can be sharp, so always wear gloves and safety gear when handling materials.
- Double-check measurements: Take extra time to ensure everything is properly aligned and level before securing panels or fasteners.
Conclusion
Building your own small metal shed or workshop can be a fulfilling DIY project that provides a functional and lasting space for storage or work. By carefully planning, gathering the right tools, and following step-by-step instructions, you can complete the project efficiently and enjoy the benefits of your new structure for years to come.
FAQs
Do I need a permit to build a metal shed?
Permitting requirements vary by location. Check with your local government to determine if you need a permit for your specific project.
Can I insulate a metal shed?
Yes, you can add insulation to your metal shed to help regulate temperature and reduce noise.
What type of foundation is best for a metal shed?
A concrete slab provides the most durable foundation, but a gravel base is also a good option for smaller sheds.
Is it difficult to build a metal shed on my own?
With the right tools and materials, building a small metal shed is achievable as a DIY project. However, working with a partner can make the process easier.
How long does it take to build a metal shed?
The time it takes to build a metal shed depends on the size and complexity of the structure, but most small sheds can be completed in a weekend.
For more information click here.


